пятница, 30 октября 2015 г.

Anatomy of the Kettlebell Swing


The swing is the foundational movement of kettlebell training.  It teaches movement patterns, breathing protocols, energy management and key principles that carry over to other exercises and countless athletic activities.   
The benefits of the swing are equally diverse.  It’s a fully body exercise that synergistically couples strength training with aerobic/anaerobic conditioning and develops a “smart” nervous system.  The swing and its variations can be used to burn fat, improve power, boost endurance, enhance mobility and develop a host of other attributes on the athletic continuum. Moreover it’s becoming increasingly popular in the therapeutic community as a way to counter injury due it’s focus on strengthening the posterior chain. 
The focus of this article will be on movement mechanics and proper breathing in the swing.  In future articles, we will cover additional variations, training programs and more.  
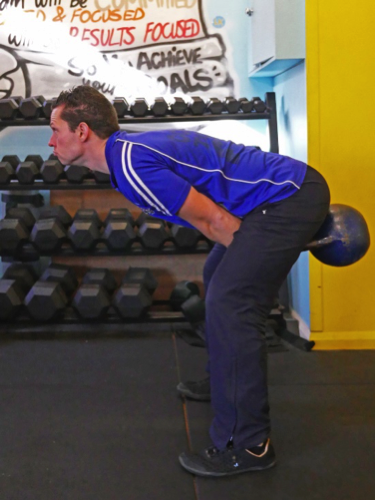
To start, we want to discuss hip and knee mechanics in the swing.   There are two primary variations:
*Squat swing – like the name implies, as the kettlebell is swung between the legs, the lifter squats down via flexion in the hip, knee and ankle joint.  Spine is neutral and head is neutral.  From there, the bell swings up and the same joints go into extension. This is a leg dominant vs. momentum based movement, allows for faster pacing and is ideal for heavier weights, interval work etc. based on how quickly it jacks the heart rate.  


*Pendulum spring - as the kettlebell drops, the weight of the bell is first absorbed via a shallow knee bend, the hips then transition the  energy backward in a horizontal plane, knees move toward locking/close to locking and the movement is reversed back into extension.  As with the squat swing, the spine is neutral, the head is neutral with the primary difference being that it is a momentum based vs. leg dominant movement.  So, it’s more congruent with longer sets (example – 10 min k-bell sport competition sets) due to it being less “work”, more efficient via lowering the heart rate etc.


So, both have benefits depending on the weight of the bell, goal for the training session and anatomy of the athlete. 
In regard to breathing, there are two general variations:
*Paradoxical breathing – as the kettlebell drops in the backswing, the athlete’s inhales, then as the k-bell finishes the upswing, the athlete exhales. In other words, inhale on compression, exhale on extension.  This breathing variant creates thoracic pressure which protects the spine. Thus, a good match for heavier weights and de-conditioned lifters who struggle with core stability.
*Anatomical breathing – this is the reverse of paradoxical breathing.  Instead of inhaling on compression and exhaling on extension, you exhale on the backswing (compression) and inhale on the upswing (extension).  To make conceptualizing the rhythm easier, only think of the exhale points since if you blow out with enough force to create a casual puffing of the cheeks, the inhale will take care of itself/happen organically. 
 For 1 cycle anatomical breathing, the exhale is at the back of the backswing.  For 2 cycle anatomical breathing, the first exhale is at the back of the back swing and the second exhale as the arm leaves the body before finishing the upswing.  This type of breathing is ideal for maximizing oxygen and lowering heart rate.
In addition to hip/knee mechanics and breathing, I also want to talk about the importance of “connection” and “deflection”. 
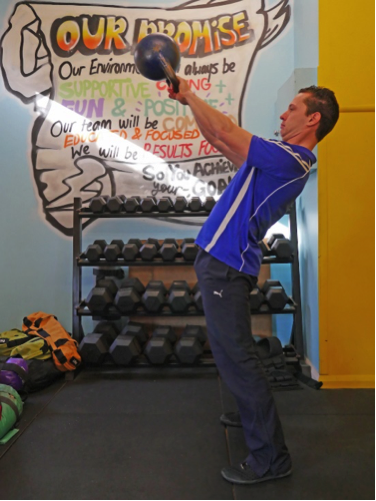
*Deflection – at the top of the swing, the lifters wants to extend the pelvis so the upper body “deflects” back.  This  compensates/keep the body balanced for the load in the front.  In addition, as the kettlebell starts to drop into the backswing, the athletes want to maintain this deflection until the tricep/elbow makes contact with the torso.  Once that happens, the lifter can then transition into the squat or pendulum spring mechanic.   This timing counters trauma to the back and keeps the body unified during the movement.
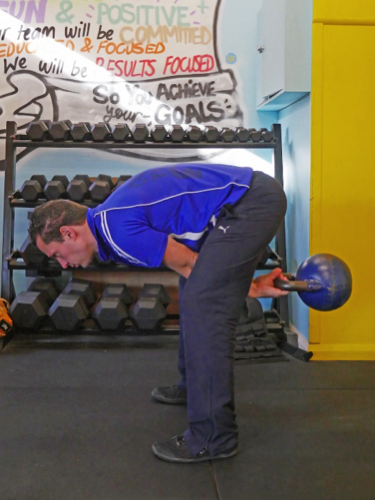
*Connection – as the bell swings between the legs, we want to focus on keeping the arm connected to the hips/inner thigh and maintain that on the upswing for as long as possible to ensure power transfer from the primary movers (legs, hips, back) to  the secondary movers (arm).  As with deflection, we want the body to stay unified via working together as one unit vs. separate individualistic parts. 
Last, in reference to what the free arm is doing, we want it relaxed and mimicking the path of the k-bell.  
I hope this helps with your training!  As mentioned, in future articles, we will dive into additional technical details, corrective drills, advanced variations, example workouts and more!

Ken Blackburn is the International Team Leader and Head Master Trainer for the IKFF (International Kettlebell & Fitness Federation) and is widely considered amongst the top kettlebell sport coaches in North America.  For information on his online training, IKFF certifications  and/or seminars, you can contact him at kenblackburn@ikff.net

Basic Yet Effective Kettlebell Swing Workouts for Martial Arts and MMA

In the last article, we discussed the general mechanics and breathing involved in the kettlebell swing.   Now, we will look at example workouts that target “work capacity” – the ability to be strong , explosive yet fluid over longer durations (1 to 5 min).   Although the focus is on the swing for Mixed Martial Arts, the following protocols are applicable to anyone who wants to improve their strength, cardio and overall athleticism.  In other words, you don’t have to be a fighter to train like one. 
The swing is an ideal movement for any combat athlete due to the quick transition from a compressed posture (squat) to full body/hip extension.   This mimics “from the ground up” power generation used in striking and specific movement mechanics involved in numerous submissions (example – armbars).  In addition, it’s also congruent with the heart rate demands of an athlete competing at anaerobic threshold (80% to 90% of max hear rate) for an extended amount of time.  
As you will see below, it’s not just weights, reps and sets.  We also focus  on what we call “training for time”.  For the below, we use the example of an MMA fighter whose rounds are 5 minutes in length.  Of course, the time can be changed/adjusted depending on the activity (Boxers competing for 3 min rounds)
To start, we will utilize a basic hand to hand swing (switch hands at the top of every repetition) to illustrate this concept.  Below is an example progression to 5 min. 
Hand to Hand Swings:
Week 1: 1 min set x 1 min rest x 5 sets 
Week 2: 1:40 min set x 1 min rest x 3 sets
Week 3: 2:30 min set x 1 min rest x 2 sets
Week 4: 5 min set x 1 set
To build hip drive, explosiveness and overall power, we can use a double swing (done with two k-bells). Due to the heavy loading, these drills are best configured as “sprints”.  Below is an example progression. 
Double Swings:
Week 1: 10s on x 10s off x 10 sets
Week 2: 15s on x 15s off x 10 sets
Week 3: 30s on x 30s off x 10 sets
Week 4: 1 min on x 1 min off x 5 sets 
Week 5: 1 min on x 30s off x 5 sets
To build coordination, footwork and the ability to respond to external stimuli, the two handed walking swing is excellent !   The athlete will hold the k-bell with two hands, a coach/training partner will give a command on the backswing to “walk forward”, “walk back”, “step to the right, “step at a 45 degree angle” etc and they respond accordingly.  If they struggle with the response/reflex element, a pre-arranged “k-bell kata” can be constructed instead of the coach calling out commands. Example - three steps each direction plus three 45’s for the designated time. Below is an example progression:
Two Handed Walking Swings
Week 1: 1 min on x 1 min off x 5 sets
Week 2: 1:40 min on x 1 min off x 3 sets
Week 3: 2:30 min on x 1 min off x 2 sets
Week 4:5 min x 1 set
Key Points:
The above is a general/linear template.  Depending on the athlete, variables such as the weight of the k-bell, work time and recovery time can be modified.  As an example, if an athlete is attempting to transition to a higher weight and is struggling, the sets can be alternated between that weight and a lighter weight.
Pacing inside a set should be tracked as well. So, overall, the athlete is monitoring/measuring variables such as the length of the set, rest time, weight of the k-bell and reps per min to assess progress.  Done this way, it removes the ambiguity surrounding whether performance is improving or not.
Heart rate is another excellent variable to track.  So, if the same workout is done in month 1 and month 2 and all other variables are the same (weight, set length etc), a lower heart rate in month 2 is indicative of a conditioning improvement.  Conversely, if the heart rate is significantly higher, it can be valuable in terms of identifying a problem with recovery, over-training etc.
Milestones to shoot for – Regardless of activity, it’s important to have goals.  As an example, for the hand to hand swing drill, a 165lb athlete I trained was aiming for a 5 min set with a 40kg k-bell (88lbs).  After first completing with a 20kg, 24kg and 32kg bell, he eventually progressed to completing with the 40kg bell at a pace of 30 reps per min (13,200lbs of work).  This type of conditioning has tremendous carry over to a combat situation.  Moreover, due to the nature of this training, it tends to build strength  and endurance but not bulk (important to those fighters not wanting to bump up a weight class)
As mentioned in the previous article, everything starts with good technique and breathing.  This ensures optimal performance and most importantly, avoiding injury and staying safe.
Of course, there are infinite variations with these drills. They can be combined with bodyweight movements, running, skipping rope, hitting focus mitts etc.  Example – hit the mitts for 1min and alternate with 1 min of hand to hand swings with the eventual goal being a continuous 5 min set.  Be creative and have fun!
In a future article, we will talk about combining the kettlebell with the Bulgarian Bag!  The later being a phenomenal tool for developing rotational power and conditioning!
Ken Blackburn is the International Team Leader and Head Master Trainer for the IKFF (International Kettlebell & Fitness Federation) and has been an active martial artist for over 30 years. He currently coaches several fighters on their strength & conditioing including UFC Fighter Joby Sanchez. For information on his online training, IKFF certifications  and/or seminars, you can contact him at kenblackburn@ikff.net

четверг, 29 октября 2015 г.

Side-Step Kettlebell Swing


This is an intermediate-to-advanced level move that offers many similar benefits to the standard swing – it develops power and explosiveness, will help you burn fat and take your conditioning to the next level, and much more … BUT it also adds in a little extra “twist” that makes it a fun variation to add to your KB workouts.

Here’s how to do it:

1 – Begin with the basic two-handed swing
2 – When the kettlebell is on its way down, put your right foot out and step to the right
3 – When the kettlebell is up, bring your left foot over to meet your right foot, so your feet are together
4 – Continue taking steps to the right as space allows, then change direction and side-step to the left for the same number of repetitions

And here’s what the exercise looks like:


Try that one during your kettlebell workout today, and let me know how it goes!

- Forest Vance
Level 2 Certified Russian Kettlebell Instructor

вторник, 27 октября 2015 г.

3 Most Common Mistakes When Performing the Kettlebell Swing Exercise


‘Neutral Spine’ is spoken more than any other phrase when I’m training someone how to properly use a kettlebell. I preach the importance of a neutral spine with a vast majority of not just kettlebell exercises, but all movements. So why are so definitive on this concept and why do we believe it is so important?
Firstly, we need to define what a neutral spine is as we often have people confused with what actually constitutes a neutral spine. The greatest misnomer is that it is a flat spine. This, of course, is not true. The spine has ‘natural’ curves that need to be maintained under load.

Performing the Kettlebell Swing with a Neutral Spine (Eyes on the Kettlebell)

Defining a neutral spine even further is problematic as the angles can differ between people (for example women have more of an anterior pelvic tilt than men). However, the optimal spine curvatures are between 30-35 degrees for the lumbar lordosis and the same for the thoracic kyphosis and cervical lordosis (Chek 2001).
A neutral spine can also be characterized by the position where there is the least possible stress to the surrounding passive subsystem of the joints.

When we compromise these curvatures and place more stress on the surrounding subsystem of joints, then we increase the likelihood of an injury occurring. 60-80% of the population suffers back pain or injury at some point. In the majority of cases, this could have been avoided with proper spinal positioning both when exercising with a kettlebell and when performing everyday activities.
I often hear the lay person say that “Kettlebells are bad for the back”. It’s true…. Kettlebell exercises are bad for the back when they are performed without a neutral spine. While maintaining a neutral spine the opposite is true – kettlebell swings are one of the best exercises for developing strength in the lower back and posterior chain.
One of the areas that is most contentious is the neck position in movements such as the swingclean and snatch. The neck is part of the spine yet people love to look upwards throughout the motion. Overemphasized lordosis in the neck will trickle down to the thoracic and lumbar spine (Weingroff).
You see, the hyperextended curve in the neck will need to find compensation further down the spine and therefore, further lordosis of the lumbar spine will occur. This means we increase the potential for stress in the spine and can increase the shearing forces in the discs.

Most Common Mistake #1. The Kettlebell Swing with the Neck Hyperextended

You may be completing kettlebell swings with excessive lumbar flexion and not feel it in your back as you do so. However, you are most definitely doing long term damage and there will be significant ramifications in the future. Repeated flexion of the spine leads to shortened tissues on one side of the joint and lengthened tissues on the other.
The shortened tissues become compressed and dehydrated and this leads to a decrease in contractile strength. On the other side, the lengthened tissues will lose their tensile strength. This decreased strength can culminate to a greater vulnerability to injury from decreasing loads (McGill, 2002).
It is quite common to see people suffer a back injury after doing something innocuous such as sneeze, lift a light load or pick up their child. It is the years of excessive flexion and loss of neutral spine that led to this point and created this vulnerability.

Most Common Mistake #2. The Kettlebell Swing with Excessive Lumbar Flexion

Excessive lumbar hyperextension at the top of the kettlebell swing or deadlifts is also quite common and happens unknowingly in many cases. This has the potential to damage the facet joints and impact the nerves. It should be avoided at all costs.

Most Common Mistake #3. Hyperextension in the Kettlebell Swing

Quite often you may be completing movements without a neutral spine and may be totally unaware. Many people find it difficult to coordinate a hip hinge movement whilst maintaining a neutral spine.
They lack lumbopelvic rhythm and there is excessive flexion or extension somewhere in the spine as a compensation. Creating an awareness of moving with a neutral spine is a necessity and there are a few techniques that can reinforce this.
The first is completing the hip hinge with a dowel held along the spine. The key is to maintain the 3 points of contact (head, in between the shoulder blades and the sacrum) on the dowel.

The Dowel Technique

Once you are proficient with the movement and maintaining contact, then you can add an external load and remove the dowel. Getting a video of your movements via the application ‘Coach’s Eye’ is a great way of monitoring the technique and ensuring the neutral spine is maintained.
The ability of the spine to handle compressive forces is also vastly diminished when it is not in a neutral position. In addition, performing exercises – all exercises, not just kettlebell exercises – with a neutral spine also optimizes the length-tension relationships that allow a greater capacity to generate force. Transversus abdominus activation is also optimized.
Maintaining a neutral spine leads to less injuries, unnecessary compensations, energy conservation, better core activation and an increased capacity to handle compressive forces as well as improved scapular mechanics.
I hope you can now see why we so passionately preach the importance of a neutral spine within our courses and are convinced it is imperative when doing a kettlebell workout, but with other forms of functional training as well.

The Kettlebell Swing: Correct Vs. Incorrect Form


References

Chek, P. (2001). Movement that Matters
McGill, S. (2002). Low Back Disorders: Evidence Based Prevention and Rehabilitation.
Weingroff, C. (2010). Packing the Neck. http://charlieweingroff.com/2010/11/packing-in-the-neck/

10 Movements For Explosive Power


10-movements-for-explosive-power

Here's what you need to know...

  1. Training your body to be explosive will lead to the recruitment of more motor units, which will make you stronger and more powerful.
  2. The hang snatch requires a lot of technique but learning it will pay off. The kettlebell swing with a resistance band will add explosiveness to an already effective movement.
  3. The medicine ball side throw increases power in the upper body while clean pulls will help you improve all other Olympic lifts.
  4. Seated box jumps will remove all eccentric loading and take the arm swing out of the equation.

The Keys to Power and Explosiveness

Building power in the gym requires moving weight fast enough to recruit the most motor units possible.
Each of the following movements should be programmed early in your daily training session to help you build serious power and explosiveness. You'll get the most out of these power movements while fresh.
Your goal with each is to recruit the maximum number of motor units before fatigue sets in.

1 – Hang Snatch

In terms of power output, the snatch matches the clean closely, but for pure coolness the snatch wins every time.
The snatch may be heavy on technique, but once you get the hang of it (after some coaching), you'll find its power-creating potential unparalleled. And it creates power that carries over to the rest of the weight room.
I've never met an athlete that's strong enough to snatch 225-pounds that couldn't squat, clean, and bench with the strongest carnivores in the gym.
Why not the power snatch? It's easier for most to achieve a respectable starting position from the hang than it is from the floor. The snatch from the floor also takes more mobility at both the hips and ankles.

2 – Kettlebell Swings With Band Resistance

Most athletes will find themselves quickly running out of kettlebells as they start to get stronger with swings. Adding a band to this movement can add 30-70 pounds of resistance at the top while addressing the end range of hip extension.
To add band resistance use a half-inch to one-inch band. Just loop it through the handle and then back through itself, then step on the end of the band with each foot and you're all set to swing.
With extra band resistance you also won't have to go out and buy giant, novelty-sized kettlebells.

Bonus "No band" Movement: Kettlebell Spikes

What happens when you don't have any bands? Simply enlist an awesome partner to help you perform the kettlebell "spike."
At the top of each swing, have your friend mimic the action of a band and spike the kettlebell back toward the ground. This requires you to resist a tremendous eccentric force, so prepare to feel it in the old hams tomorrow.

3 – Split Jerk

The jerk can generate more power than both the clean and the snatch, and is a tremendous exercise for developing power through quad-dominant movement.
The power jerk is an awesome move as well, explosive and total body, but splitting the feet takes it to the next level.
Much of what you do as an athlete revolves around being able to adapt to changing conditions, and changing from a bilateral stance to an offset, semi-unilateral stance trains you to be adaptable.
It also trains your lead leg to be strong in absorbing force. If you have any aspirations of being fast or athletic, this movement is a must for your training program.

4 – Medicine Ball Throws

Throwing things is an unbridled expression of power. Throwing a medicine ball is unlike anything else that we can do in the gym. No deceleration period, only acceleration.
This movement trains power in the transverse plane. Transverse plane power is necessary for nearly every athlete, from the high level football player during a change of direction to the beer-league softball player during all non-beer drinking activities.
Throwing a med ball is an awesome core movement to redirect force from the ground through the upper body. The link between hip rotation, core stability, and the expression of power through the upper body is hard to miss and tough to beat.
Make sure you generate power through the lower body and rotate the back foot to finish the movement.

5 – Power Clean From Blocks

For most athletes, cleans from the floor are difficult to do with good form. Starting the lift off blocks provides the same explosive benefits without exposing your back to injury.
There's a performance benefit as well. By eliminating the eccentric lowering of the bar to the start position, power cleans from blocks also help develop starting strength.

6 – Clean/Snatch/Trap Bar Pulls

The Olympic pull is an absolute must if you have any interest in being a better Olympic lifter. At higher loads, it's a great way to get acquainted with moving serious weight in all other Olympic lifts.
In the video I'm doing pulls from a deficit first and then contrasting it with a pull from the ground level. Only athletes that have sufficient mobility should try pulls from a deficit.
Both the clean pull and snatch pull help improve your feel with either lift, and you can also do a similar movement with a trap bar. The big advantage with the trap bar is that it allows you to keep the load closer to your center of gravity as opposed to in front of the body in the traditional pull.
The pull is great for athletes with flexibility limitations or when trying to reduce the impact on the upper body. Just be careful not to let the quality of the movement diminish when the weights start to get heavy.

7 – Crossover Sled Drags

We've been able to figure out a ton of ways to increase power; unfortunately, most of these methods occur in the sagittal plane. But improving power in only the sagittal plane will only get you so far.
To be truly powerful, in every direction, you need to train in multiple planes.
The crossover sled drag is an awesome tool to train in the frontal (side to side) plane. This explosive move is just like the first step that aspiring NFL players take when they test their lateral movement at the NFL combine.
Heavy crossover sled drags also train your backside like nothing you've ever done before.

8 – Rotational Lunge Swings

A simple rotation of the sandbag (or kettlebell) while descending into a reverse lunge will challenge your strength and core stability in the transverse plane.
Then, when you add in the power of a swing, what you wind up with is a really cool explosive movement. The swing requires decelerating the implement at the bottom of the movement before you explode from the lead leg into hip and knee extension.

9 – Seated Box Jumps

While most plyo takes advantage of the stretch-shortening cycle to produce power, the seated box jump removes all eccentric loading and allows athletes to focus on only the explosive, concentric action of the movement.
Taking the swing out of the arms will force you to focus on developing power from the ground up. To take this movement to the next level, hug a weight to your chest. You'll get a loaded plyometric movement that doesn't trash your joints.
Like any box jump, make sure you're truly able to land on the box to which you're jumping. Choosing a box that's too high doesn't make you more of a man, though it will remove some flesh from your shins when you miss.

10 – Supine Medicine Ball Reactive Throws

Most of the movements used to train explosive power have a distinct lower body bias. The supine medicine ball reactive throw is an awesome tool to improve upper body power.
These throws train you to maintain a good position through a fast eccentric phase, and then explode through the concentric motion to finish strong. Try using these throws in a superset with the bench press and watch yourself power through the lockout.

One More Tip

Don't believe anyone who says you can't build explosiveness. It can be done, and it begins with hitting the old school staples like the power clean and snatch with gusto.
These aren't the only tools in your toolbox. The more expansive your assortment of explosive movements, the better you'll be at rising to whatever athletic challenges may be in your future.

Related:  The Comprehensive Guide to The Snatch

Related:  Olympic Lifting Made Simple

Related:  Stop Doing Box Jumps Like A Jackass

References

  1. USA Weightlifting Club Coach Manual. USA Weightlifting. Colorado Springs, CO (2010). Print.
  2. Stone, M.H. Position paper and literature review: Explosive exercises and training. Natl. Strength Cond. Assoc. J. 15(3):7, 9-15. 1993

понедельник, 26 октября 2015 г.

Fast Abs: 4 Fat-Burning Finishers


Kettlebell-swing

Here's what you need to know...

  1. To burn fat, you of course need to get your diet in order, so eat animal protein and cruciferous vegetables with avocado or olive oil whenever you're hungry, use workout nutrition, and drink only water and green tea.
  2. Once you've got your diet in order, you need to burn fatty acids by doing workouts that have a high metabolic cost, and the best way to do that is to add finishers 3-4 days a week.
It's time to get down to business and crank up your fat-burning thermostat. Here are my three rules for fat loss:
  1. Get your diet in order.
  2. Get your diet in order.
  3. Add finishers to your workouts.
My first two rules are easiest to address, and I'll prove it with one sentence, even if that means I have to bend some of the rules from The Elements of Style:
When you're hungry, eat animal protein and cruciferous vegetables with avocado or olive oil, use workout nutrition, drink only water and green tea, and don't eat unless you're hungry.
With that out of the way, let's get to the cool stuff.

The Science of Fat Loss

The physiology of fat burning is pretty well understood. Hormone-sensitive lipase is the key player for stoking the process, mobilizing free fatty acids from adipose tissue so those little globs of fat can be dumped into the blood. Then, carnitine transports the free fatty acids into the mitochondria where they can be burned for energy.
What's less understood about the physiology of fat burning is the number of factors that can hinder it. One thing is certain: a crappy workout with low metabolic cost will not make you burn fat. So how do you get your adipose tissue to release more fatty acids from training? It's simple but it ain't easy: add the finishers I'm about to describe into your workouts.

As the Name Implies

What's a finisher? It's an intense exercise, or combination of exercises, that stimulates all the major muscle groups to induce the highest metabolic cost possible. Basically, it's the longest 5 or 10 minutes of your life. And just like the name implies, it should be performed at the end of your workout. There are two reasons why.
First, your available energy stores are lower than normal after a strength training session. This depletion creates the ideal time to augment the demand for energy since your metabolism will trigger hormone-sensitive lipase in adipocytes in order to provide this energy. Translation: you can stimulate a helluva lot of fat burning at the end of a workout.
Second, if you do a finisher correctly, you won't want to do anything afterwards. A finisher should be exhausting up to the edge of nausea, and even though you might feel a bit queasy for a few minutes, you can take pride in the fact that you stoked your fat-burning engine that had been stored away since last summer. The proton accumulation and muscle acidification that caused the nausea are a powerful stimulus for fat loss.
Kettlebell Swing

4 Finishers that Build Mettle

I'm assuming you're a guy or gal who's already in pretty decent shape but is smooth around the midsection. The following four finishers are organized from easiest to toughest, but they're all uniquely intense in their own way.

1 – 30/20/10 Double Countdown: Kettlebell Swing and Clap Push-up

This combination is popular because it only requires a kettlebell. You can do it almost anywhere, and it's probably the easiest of all five.
How to do it:
Start with as many kettlebell swings as possible in 30 seconds
Rest 30 seconds
Then do as many clap push-ups as possible in 30 seconds
Rest 30 seconds
Next do swings hard and fast for 20 seconds
Rest 20 seconds
Follow it up with 20 seconds of clap push-ups
Rest 20 seconds
Finish with 10 seconds of swings, 10 seconds of rest, and 10 seconds of clap push-ups
Rest for 30 seconds and repeat the sequence once more

2 – 150 Reps of Pain: Band Jump Squat and Judo Push-up

The band jump squat and judo push-up is an awesome combination, but it becomes pretty brutal when you have to knock out 150 total reps as fast as possible. Get ready for pain.
How to do it: Start with15 band-jump squats, then drop to the ground (keep the band on) and do 15 judo push-ups. The next round is 14 of each. Continue dropping a rep each round until you reach 10. Make rest your nemesis and keep it at bay from start to finish.

3 – The 2-Minute Full-Body Scorcher: Squat, Curl and Push Press

This challenging complex can be performed with a kettlebell or a dumbbell in each hand. It's an ideal finisher for people that are short on time and don't have a lot of space to move, but it's also great for everyone else that wants to burn fat and build their anaerobic threshold.
How to do it: Stand with feet shoulder-width apart while holding a weight in each hand, arms hanging at sides. Push the hips back and squat until the weights are just below the knees. Quickly stand up as you simultaneously curl the weights and then dip down a few inches and push-press the weights overhead using leg assistance. This entire movement should be smooth without any hesitation. Bust off as many hard and fast continuous reps as possible in two minutes.

4 – 7 Minutes of Whatever is Worse Than Hell: Sled Push and Pull-up

This is my favorite ass-kicking, nausea-inducing finisher for athletes. However, it's also the most impractical because most people don't have a sled to push, and if they do it's probably nowhere close to a pull-up bar or a set of rings. Still, I couldn't write an article on finishers without mentioning it.
How to do it: Start by pushing a sled back and forth, hard and fast, along a 20-meter stretch for as many rounds as possible in 60 seconds. Next, jog to the pull-up bar or rings and perform as many reps as possible in 60 seconds (you'll most likely need to stop at least once during that time to avoid hitting failure, because if you do hit failure, it'll probably be impossible to knock off anymore reps in that time). Then jog back to the sled, push it hard for 50 seconds and jog over for 50 seconds of pull-ups (again, avoid failure). The next round is 40 seconds of each, followed by 30 seconds and 20 seconds of each. Finish with the hardest, fastest 10 seconds of the sled push and pull-ups your body can muster.
Note: I've built a thick skin due to the insults that were hurled at me from athletes after they regained consciousness from this finisher.

Final Words

Of course, any of these finishers can be performed with different exercises, but I recommend you stick with the basic parameters outlined above because they've been battle-tested. Add one of the finishers to the end of your workouts, 3-4 days per week, and you'll start scorching body fat as you build muscle and mettle.