четверг, 30 июня 2016 г.

УПРАЖНЕНИЕ ДНЯ ОТ MHEALTH.RU: РЫВОК ГИРИ — СМОТРИ И УЧИСЬ!

Рывок гири — одно из основных упражнений гиревого спорта. Вместе с тем, что оно невероятно популярно среди гиревиков-профессионалов и среди любителей, оно довольно травмоопасно. Чтобы избежать неприятностей, изучи правильную технику выполнения рывка гири вместе с нашим наглядным руководством. 


Фото 1 -  Упражнение дня от Mhealth.ru: рывок гири — смотри и учись!
Обязательно разомнись, сделав простые гимнастические упражнения вроде приседаний, махов руками и выпадов. После этого возьми сравнительно легкую (примерно в половину от своего рабочего веса) гирю и выполни рывок с ней. Обрати внимание на хват: он должен быть прямым на протяжении всего упражнения. 
После того, как ты размялся с легкой гирей, бери рабочий вес. Возьми гирю в правую руку и поставь ноги на ширину плеч. Чуть согни ноги в коленях и выпрями спину. Прямую руку со снарядом опусти между ног. Качни гирю назад и, оттолкнувшись правым предплечьем от правого бедра, вырви ее вперед и вверх, вовремя подсев и приняв на прямую руку. В верхней точке, еще в процессе полета, разверни гирю так, чтобы она легла шаром на часть предплечья, обращенную назад.


Читать всё: http://www.mhealth.ru/form/fitness/_uprazhnenije_dna_ot_mhealth_ru_ryvok_giri__smotri_i_uchis/#ixzz4D5la2XSa

среда, 29 июня 2016 г.

10'000 махов.

● Вкратце о главном.

Если никак не напрягать наше тело, оно начнет слабеть. Люди прям расцветают, когда стремятся к цели, преодолевают трудности и перебивают личные рекорды. Мы тренируемся лучше, выглядим лучше и чувствуем себя лучше.

● Полная статья.

Развивайтесь или будете деградировать

Поймите простую вещь: есть только прогресс и регресс. Нет никакой поддерживающей фазы, Нео. Умеренные нагрузки быстро приводят к стагнации. Так что если цель - улучшение себя, необходимо искать новые испытания, бороться и побеждать.

Именно таким испытанием и является программа "10000 махов". А еще она заметно изменит вашу фигуру всего за 4 недели.

Проверено практикой

Я не выдумываю программы, начитавшись учебников и исследований. Я составляю их, тренируя в зале и на поле профессиональных атлетов и иных людей, жизнь которых зависит от физической формы.

Почти два десятка тренеров и спортсменов отрабатывали этот протокол в течение нескольких недель.

Вот что мы выяснили:

- У каждого участника талия уменьшилась на один-два размера, зато прибавилось сухой массы.
- У всех стал сильнее хват, повысилась работоспособность, улучшилась спортивная форма.
- Все смогли тренироваться дольше и интенсивнее, вернувшись к традиционным программам.
- Каждый обнаружил, что стал сильнее в своих основных упражнениях.
- Личные рекорды попадали как домино. Сила и мощность всего тела взлетела до небес.
- Прорисовался пресс, окрепли ягодичные. Эти мышцы вдруг проснулись и взялись за работу, как на спортивных состязаниях, так и во всех обычных упражнениях.

Суть схемы

Вам предстоит сделать 10000 махов за 4 или 5 недель. Всего за 20 тренировок. С помощью сложных математических расчетов можно вычислить, что на каждой тренировке получается по 500 махов.

Между подходами махов вы будете выполнять обычные силовые упражнения в малом числе повторов. Тренироваться надо 4-5 раз в неделю: два дня пашете, потом один отдыхаете и т.д. Мужчинам стоит начать с 24 кг, женщинам лучше с 16 кг.

Это самодостаточная программа, ей не нужны никакие дополнения. Если в день после тренировки хочется что-то еще покачать - вы недомахали. Или слишком легкая гиря, или совсем не старались.

Махи: блоки, подходы, повторы

Чтобы набрать 500 махов на каждом занятии, следуйте такой волне:

Подход 1: 10 повторов
Подход 2: 15 повторов
Подход 3: 25 повторов
Подход 4: 50 повторов

Так у вас получается блок из 100 повторений. Повторите его еще 4 раза. Между махами - если вы достаточно опытны и выносливы - добавьте немного силовых упражнений.

Силовые упражнения

Помните, что объем должен быть мал. Наилучший выбор движений:

1. Жим (обычный жим штанги или жим одной рукой)
2. Отжимание на брусьях
3. Кубковое приседание
4. Подтягивание

Неплохи и эти: приседание со штангой на груди, приседание на одной ноге, отжимание в стойке на руках, выход силой. В большинстве упражнений придерживайтесь малоповторной схемы 1-2-3. Пример с жимом:

10 махов
1 жим
15 махов
2 жима
25 махов
3 жима
50 махов

Между подходами махов отдых 30-60 секунд.

Для схемы 1-2-3 используйте 5ПМ.

В отжиманиях на брусьях надо понизить интенсивность и делать больше повторений, например, 2-3-5.

Если будете проводить 5 тренировок в неделю, то на одной из них делайте только махи, отдыхая между подходами. При 4 тренировках вставляйте силовые упражнения в каждую.

Для каждой тренировки выберите лишь одно силовое упражнение, но чередуйте их по дням. Лично мне нравится делать два дня жимов и два дня подтягиваний.

Паузы отдыха

После подходов по 10, 15 и 25 махов отдыхайте 30-60 секунд. Первый блок пролетит быстрее, но в последующих вам понадобится полная минута отдыха между подходами.

После завершающего блок подхода из 50 махов восстанавливайтесь до 3 минут или даже больше. Как раз можете позаниматься этой своей "коррекцией". Порастягивайте то, что нужно, например, сгибатели бедра [благородные доны и доньи помнят, что это не бицепс бедра?]. Поделайте упражнения для мобильности.

Прогрессия

Нагрузка повышается сокращением времени тренировки. С каждой неделей надо заканчивать махи быстрее. Продолжительность двадцатой тренировки должна быть смешной на фоне первой. В силовых упражнениях возьмите такие веса, чтобы было трудновато на первых занятиях, и старайтесь с легкостью все поднять на последних.


 Вкратце о главном.

Если никак не напрягать наше тело, оно начнет слабеть. Люди прям расцветают, когда стремятся к цели, преодолевают трудности и перебивают личные рекорды. Мы тренируемся лучше, выглядим лучше и чувствуем себя лучше.

● Полная статья.

Вот как все может выглядеть для большинства тренирующихся:

Пример программы

День 1

10 махов
1 жим
15 махов
2 жима
25 махов
3 жима
50 махов

Между подходами махов отдых 30-60 секунд, после 50-повторного сета - до 3-х минут

Повторите все еще 4 раза

В итоге 500 махов и 30 жимов.

День 2

10 махов
2 отжимания на брусьях
15 махов
3 отжимания на брусьях
25 махов
5 отжиманий на брусьях
50 махов
Между подходами махов отдых 30-60 секунд, после 50-повторного сета - до 3-х минут

Повторите все еще 4 раза

В итоге 500 махов и 50 отжиманий. Помните, что на брусьях надо работать полегче, выполняя больше повторов.

День 3: отдых

День 4

10 махов
1 кубковый присед
15 махов
2 кубковых приседа
25 махов
3 кубковых приседа
50 махов
Между подходами махов отдых 30-60 секунд, после 50-повторного сета - до 3-х минут

Повторите все еще 4 раза

В итоге 500 махов и 30 приседов.

День 5

10 махов
1 подтягивание
15 махов
2 подтягивания
25 махов
3 подтягивания
50 махов
Отдых 30-60 секунд
Между подходами махов отдых 30-60 секунд, после 50-повторного сета - до 3-х минут

Повторите все еще 4 раза

В итоге 500 махов и 30 подтягиваний.

День 6: отдых
День 7: отдых или весь цикл заново.

Напоминаю, что при 5 тренировках в неделю на одной делайте только махи.

Методика маха

Мах - это наклон и распрямление. В нижней точке вы как будто готовитесь прыгнуть, максимальное сгибание в тазобедренных и минимальное - в коленных суставах. Не надо опускаться в приседание.

Сначала поставьте гирю между ног, наклонитесь, возьмитесь и энергично выдерните ее немного вверх. Затем, выполняя нормальный замах, наклонитесь ниже и отведите гирю между ног назад. А потом просто взмахните ей до положения вертикальной планки.

Оттачивать технику можно бесконечно. Но если упростить, то все выглядит именно так. Из вертикальной планки вы уводите гирю назад в замах, наклоняясь, и вновь, распрямляясь, поднимаете обратно.

Сокращайте ягодичные, держите пресс, широчайшие напряжены, чтобы был собран плечевой пояс. Руки с гирей перемещаются свободно, но по одной дуге. Поднимать выше головы не надо.

Поймайте движение и выполняйте его быстро и четко.

Следующий шаг

Сначала поздравьте себя, что продержались целый месяц на одной программе. Сегодня это редкость.

Теперь вы в намного лучшей форме, чем четыре или пять недель назад. И вам надо немного передохнуть перед новыми нагрузками.

Автор: Дэн Джон.

воскресенье, 26 июня 2016 г.

1 Exercise That Fixes 99 Problems


In today’s world we spend the majority of our days doing things in front of us with terrible posture. We crouch over keyboards while our chests cave in and our hips shorten from sitting. We drive with our arms in front of us while, again, we’re seated with shortened hip flexors.
We sit in “artificial wombs” (a.k.a. cubicles) for hours at a time not moving and making the front of our body even tighter. And then we go home and slouch on the couch further tightening the front of our bodies.
If You’re Not Doing The Kettlebell Swing, You’re Destined To Stay Fat, Tight & Weak For The Rest Of Your Life!
This overuse of the muscles on the front side of our bodies is called “anterior dominance” and it is plaguing our society. Anterior dominance results in imbalances in our muscles causing us to move and perform at sub-optimal levels. It compresses our lungs so that instead of taking deep long breaths into our belly like we were born to do, we take short, stressful breaths into our shrunken chests.
And because of our terrible posture – because our anterior muscles are shortened and tight pulling us forward – we give the illusion of being weak and un-confident as opposed to standing erect with our chins up.
It’s no wonder that we’re generally unhealthy compared to previous generations that didn’t live a convenience lifestyle in this information age. There is hope, however. And there is one exercise – that if you incorporate it into your daily routine – can easily combat the ill effects of anterior dominance and the Western Lifestyle.

The Kettlebell Swing is the Perfect “Anti-Western Lifestyle” Exercise.

Once labelled “hard core”, kettlebells are now popping up in every gym, garage and backyard because of their portability and reputation for fast results. They are the perfect portable, one-stop, biggest-bang-for-your-buck, piece of exercise equipment you’ll ever own. And if boredom wasn’t an issue, the kettlebell swing is the ONLY exercise you would ever need to do in your entire life.
The problem is that the way most people do the kettlebell swing is DEAD WRONG!!! Go into any gym and you’ll see inexperienced exercisers turning a swing into a front squat and shoulder raise exercise further tightening our hips, quads, chest and shoulders and just adding to the anterior dominance issue that I told you about above.
Simply put, improper kettlebell swing form just adds fuel to the already burning fire of postural imbalance. A perfect kettlebell swing will work your posterior chain muscles (back, abs, butt, hamstrings) and combat all the ill-effects of our anterior dominant Western Society.
It is, in fact, a hinge and NOT a squat movement. A hip hinge – like a deadlift movement – forces you to use those posterior chain muscles to move the kettlebell.
It will allow you to loosen your tight hips and strengthen your butt so that you’ll develop the rear end of an athlete. It will bulletproof your low back by creating an armored brace around your midsection, and it will get rid of that paunchy gut.
And the kettlebell swing will force you to use all the muscles in your upper back, thus opening up your chest and forcing you out of the slouchy shoulder look that screams insecurity. Yes my friend, the kettlebell swing is so good an exercise that…
“If You’re Not Doing The Hardstyle Kettlebell Swing, You’re Destined To Stay Fat, Tight & Weak For The Rest Of Your Life!”

The Kettlebell Swing Can be Summed Up With 4 Easy Verbal Cues

The Kettlebell Swing Can be Summed Up With 4 Easy Verbal Cues
1. HIKE
2. HINGE
3. ROOT
4. FLOAT

1. HIKE

Every rep counts when you swing a kettlebell – from rep 1 to rep 20 – each one should look as fluid and as powerful as the very first one. This is where the “hike pass” is so important.
As opposed to starting your set of swings from the standing position like how you see most amateurs do it, the hike pass allows you to pre-stretch your lats – a powerful muscle in your upper body with a direct relationship with your glutes – and get more “juice” out of your swing.
Set your kettlebell up about 12-18 inches in front of you. Push your hips back keeping your butt high and bend your knees slightly. Gripping the kettlebell with both hands, pull your shoulders into their sockets and fire your lats – the kettlebell will tilt towards you.
Always making sure your shoulders stay above the level of your hips, “hike pass” the kettlebell through your knees by contracting your lats. This is how you start your swing.

2. HINGE


Unlike a squat which is knee dominant, the HINGE movement is dominated by the hips. When you push your hips back keeping your butt high and your shins vertical, you are hingeing.
When you hinge, you overload your hamstrings and glute muscles. This is good because most people today are hip flexor and quad dominant (your anterior muscles), so learning how to load and use your posterior chain creates a natural balance between front and back that will help in preventing knee and hip issues.
The hinge is the foundation of the kettlebell swing. If you can’t hinge properly, you can’t swing properly. The reason why the hinge is so powerful is because we load the hamstrings like slingshots. The further back we push our rear ends, the more stretch we get in our hamstrings. Our hamstrings act as explosive, thick elastic bands.
When you drive your butt back, you load elastic energy allowing your hamstring to explosively snap back as you get into the…

3. ROOT

The ROOT is the finish of the swing. Think of the root as a standing plank where you are tightening every muscle in your body from your shoulders down…
Imagine that you are growing roots through your feet and grab the ground with your entire foot. Pull your knee caps up into your crotch (“flex” your quads).
Squeeze your glutes like you’ve got a $100 bill between your butt cheeks and someone is trying to yank it out. Brace your abs like you’re about to take a punch.
And pull your shoulders as far from your ears as possible contracting your lats. This is your ROOT position and this is your goal.
If you break down the kettlebell swing, it simply is just a series of high speed HINGEs to ROOTs. You move explosively from hinge to root to hinge to root throughout our set. You don’t worry about what the kettlebell is doing. It will react accordingly and give you feedback, letting you know if you are performing the exercise correctly.
Just remember that when you’re in the ROOT, your goal is to get to the HINGE as quickly as possible. When you are in the HINGE, your goal is to stand up and get to the ROOT as explosively as possible.

4. FLOAT

The FLOAT is what happens to the kettlebell when you do the swing correctly. It ensures that your energy is focused on your glutes and not on your trying to “muscle” the kettlebell up to a certain height. When you go from HINGE to ROOT, the harder you contract your glutes, the higher the kettlebell will FLOAT.
The higher the FLOAT of the kettlebell, the more rest you get between reps FLOAT is what the kettlebell will do while the rest of your body is in the ROOT.
HIKE – HINGE – ROOT – FLOAT …it really is that simple.
Getting proper instruction from an expert so that you can MASTER THE KETTLEBELL SWING is the best thing that you can do for your training regardless of your goal. If you want to build strength, kettlebell swings will forge a grip of steel and will add pounds to your deadlift & squat.
If you want to boost your athleticism, kettlebell swings will make you more powerful and add height to your jump and shave seconds off your sprints.
If you want to pack on muscle, swinging a heavy kettlebell will build an intimidating upper back & set of shoulders. And if you want to shed body fat, swings will incinerate blubber like butter melting in an iron pan.
There really is no downside to adding this exercise into your arsenal – provided you know how to do it correctly. Make sure you do by learning to avoid this critical error.
Find out HERE.
1 Exercise That Fixes 99 Problems

четверг, 23 июня 2016 г.

Turbo Charged Kettlebells: Setting the Foundation


It happens to all of us – after months or even years of staying consistent with our physical training, we begin to get a little bored. Everything feels redundant, boring, and even stagnant. When there is no structure around a strength practice, it quickly slides into aimless wandering.

Knowing when you need external input to jolt you awake and back into growth mode is a mark of true character and maturity. And by growth, I don’t just mean physical growth or muscle growth. I’m talking about the multi-dimensional growth that happens in conjunction with physical challenges and pushes your own limits of self-understanding and capability.

double kettlebell swing
To get the most out of your training, practice and appreciate the foundations. [Photo courtesy of Brandon Hofer]

Training Is an Opportunity for Growth

Think back to the last time you were really pushed to grow. Maybe it was by your own choice, or maybe by the collective choices of you and those around you. What happened when your mental and emotional capacity was stretched to your current limit? Did you rise to the occasion or shrink back and choose the same life you had yesterday?

Regardless of what you’ve chosen in the past, this series of articles is an invitation to take a massive leap forward and challenge your personal strength and mental acuity. What you will discover is that when you create space in your life for one type of challenge and growth, other types of challenges will present themselves, but you will only see these new opportunities if you are on the lookout. Carving out space in your life to pursue physical strength and higher-level skills will also refine other elements in your life that you’ve been neglecting. It reveals the need to develop these elements, and if you set your mind right from the beginning, you’ll be confronted with them daily. As yoga master B.K.S Iyengar says,

“Development of the mind can be accomplished only when the body has been disciplined.”

The real question is whether or not you will allow practicing these skills to do the same for you. They can be great tools for fat loss and strength building in their own right, but why stop there? Why not open yourself up to the possibilities that real growth could present to you?

Respect and Revisit the Foundations

As we dive into higher-level kettlebell skills, the imperative to maintain the essentials of the basic skills becomes even more critical.

The purpose of this series is to help you develop your foundational kettlebell skills and also prompt you to try some new skills. Whenever workouts become stagnant, we often default to the mindset of needing heavier weights, more reps, more training frequency, or even setting aside working out altogether to try something new. By shifting gears and focusing on skill development, we force our bodies into new adaptations and meet the inner need to become better and grow internally, which keeps us engaged in the process.

Here are the foundational kettlebell skills we will cover in this series:

  • Swings – To solidify your hip hinge movement pattern.
  • Cleans – To direct your energy and gain control of the kettlebell.
  • Presses – To build abdominal and shoulder stability and prep your body for what’s next.
  • Turkish Get Ups – For total body awareness under tension as a precursor to the bent press.
  • Snatches – For dynamic conditioning and a rock solid upper back.
  • Squats – To build lower body strength and the integration between lats, abs, and glutes.

Try the following workout to practice the foundational skills:

10 rounds (5R/L):
  • A1 - Swings x10
  • A2 - Clean & Press x5
  • A3 - Front Squat x5

5 rounds:
  • B1 – Turkish Getup x1R/1L
  • B2 – Snatches x10R/10L

Stay tuned for more, including tips and drills for practicing the push press, the windmill, and the bent press. In the meantime, work your foundations.

HOW TO BUILD A BEASTLY KETTLEBELL PRESS


Conquering a heavy kettlebell strict press is a puzzle that many strong people struggle to figure out. Here's your plan to crank through the sticking points and power a big weight overhead!
"How do I press a heavier bell?" That is one of the top questions I've been asked over my years as an RKC kettlebell instructor. And it's not just asked by people who are preparing for a kettlebell certification where they'll have to meet a heavy press standard. As in any type of lifting, there is a pure feeling of accomplishment when you strict press a large kettlebell overhead. 
This joy may be found in the old-time strongman image the bell taps into as you single-handedly hoist such an awkward ball of iron overhead. Part of it is the way that kettlebells generally jump up in increments of 4 or 8 kilograms rather than in tiny pound-based increments. To move up from, say, 70 pounds to 79 pounds or 88 pounds is a different game than moving from 50 to 55. And hell, pressing is just fun! 
Unfortunately, it is all too easy to hit a plateau and get frustrated with your kettlebell press. No worries my friends, Fury's got you. Here are some proven ways to crush your current kettlebell-press PR! 
For the sake of this piece, I'm going to assume you have the prerequisite healthy shoulder mobility. If you can't vertically lock your arm out at the top of the press, I would strongly advise you to work on your shoulder and thoracic mobility before moving forward. This is long-haul game. Play to win. 

BREAK IT DOWN TO BUILD IT UP

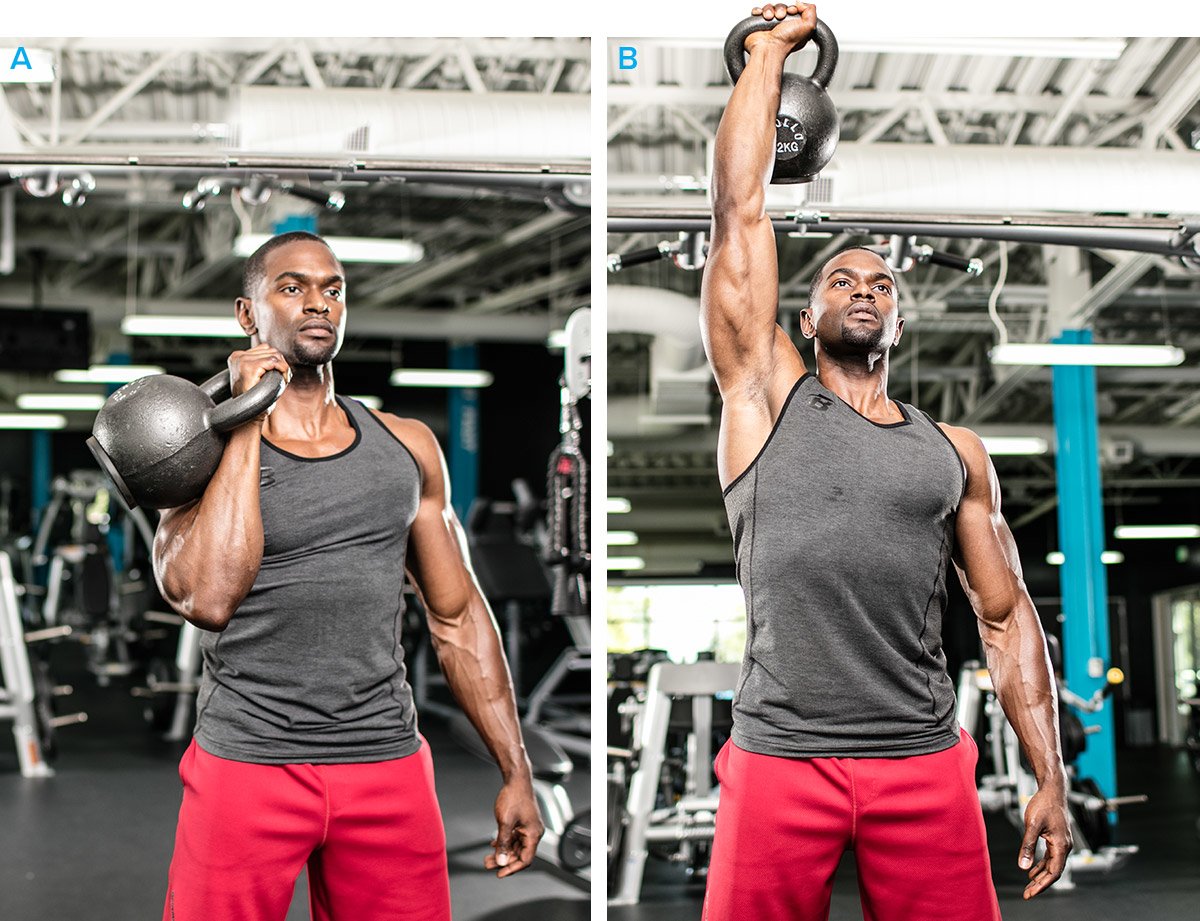
When I help someone with their press, I start by deconstructing the movement into its three basic component parts, and then we work on each separately. The three areas are: 
  • Safely having a heavy kettlebell overhead
  • The press groove
  • The clean to get the bell into position
Then, I have them work on the best drills or movements to strengthen those press components.

TO STRENGTHEN THE OVERHEAD POSITION: THE GET-UP

Assuming you're going to be embarking on a heavy pressing program to build up your press, it's crucial that you maintain or improve your overall shoulder health. Get-ups are an excellent way to both improve shoulder stability and maintain mobility. 
However, heavy get-ups also happen to be the most accessible way to get used to carrying your goal bell overhead. Time and practice will remove any fear of having the big bell up there. On a neurological level, this allows you to take the brakes off when pressing.
I'd suggest doing heavy get-ups once a week. Try alternating 5 singles per side with your 3- to 4-rep-max bell, which is usually the next size up from the goal bell you're trying to press. 
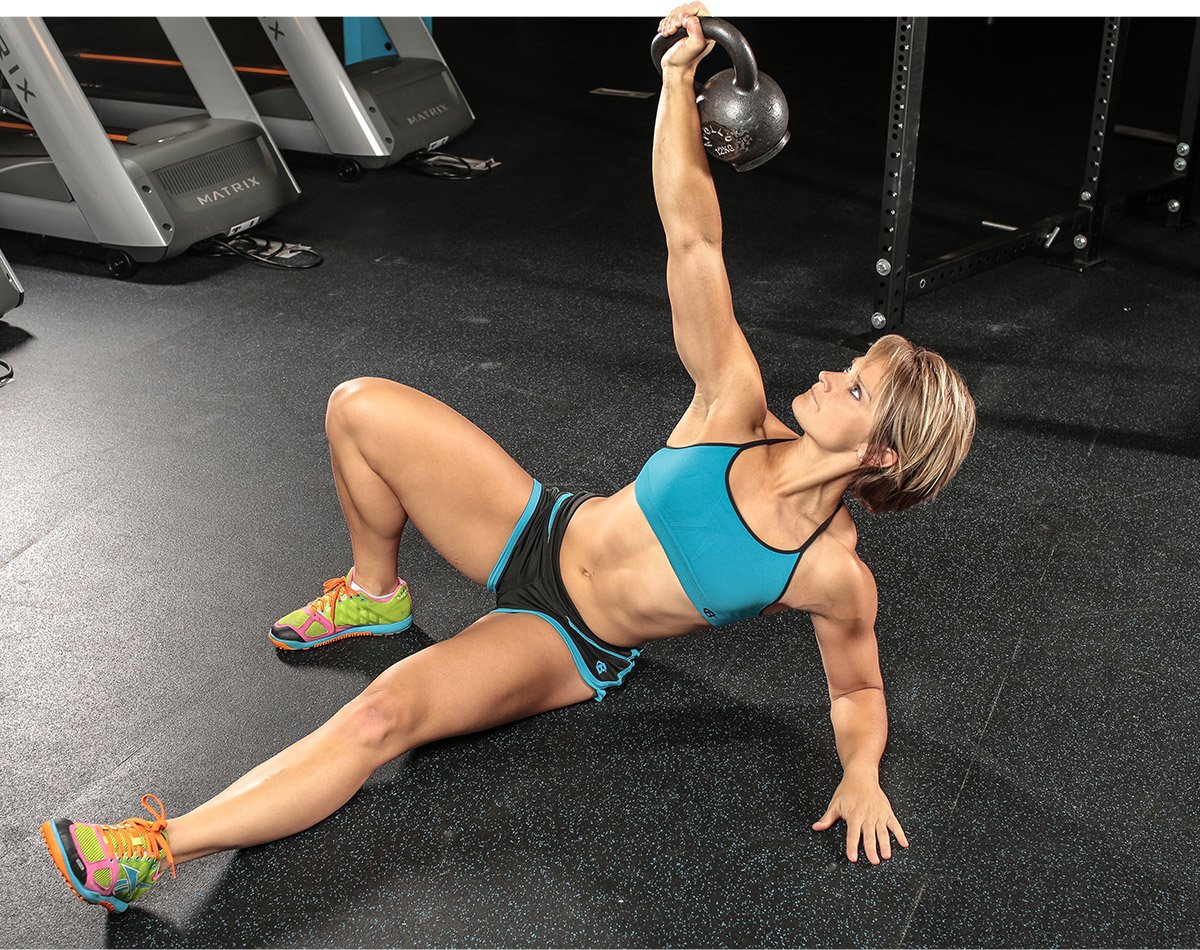
THE GET-UP

TO STRENGTHEN THE GROOVE: BOTTOMS-UP PRESS

Setting up your optimal press groove is crucial. Bad habits in your groove will become huge roadblocks as you progress. Bottoms-up pressing forces you to find the proper groove. Quite simply, the bell will fall over if you don't find the right trajectory. BUPs also force you to squeeze the hell out of the kettlebell handle. The tension generated by crush gripping will strengthen your shoulder and feed into your press.
Bottoms-up presses can be used as a warm-up to other presses or as a standalone on press day. However you use them, you'll need some volume to get strong at BUPs, as they can be quite humbling. Rep schemes like 3x5, 5x5, or 5x3 per side twice a week should do you right. 
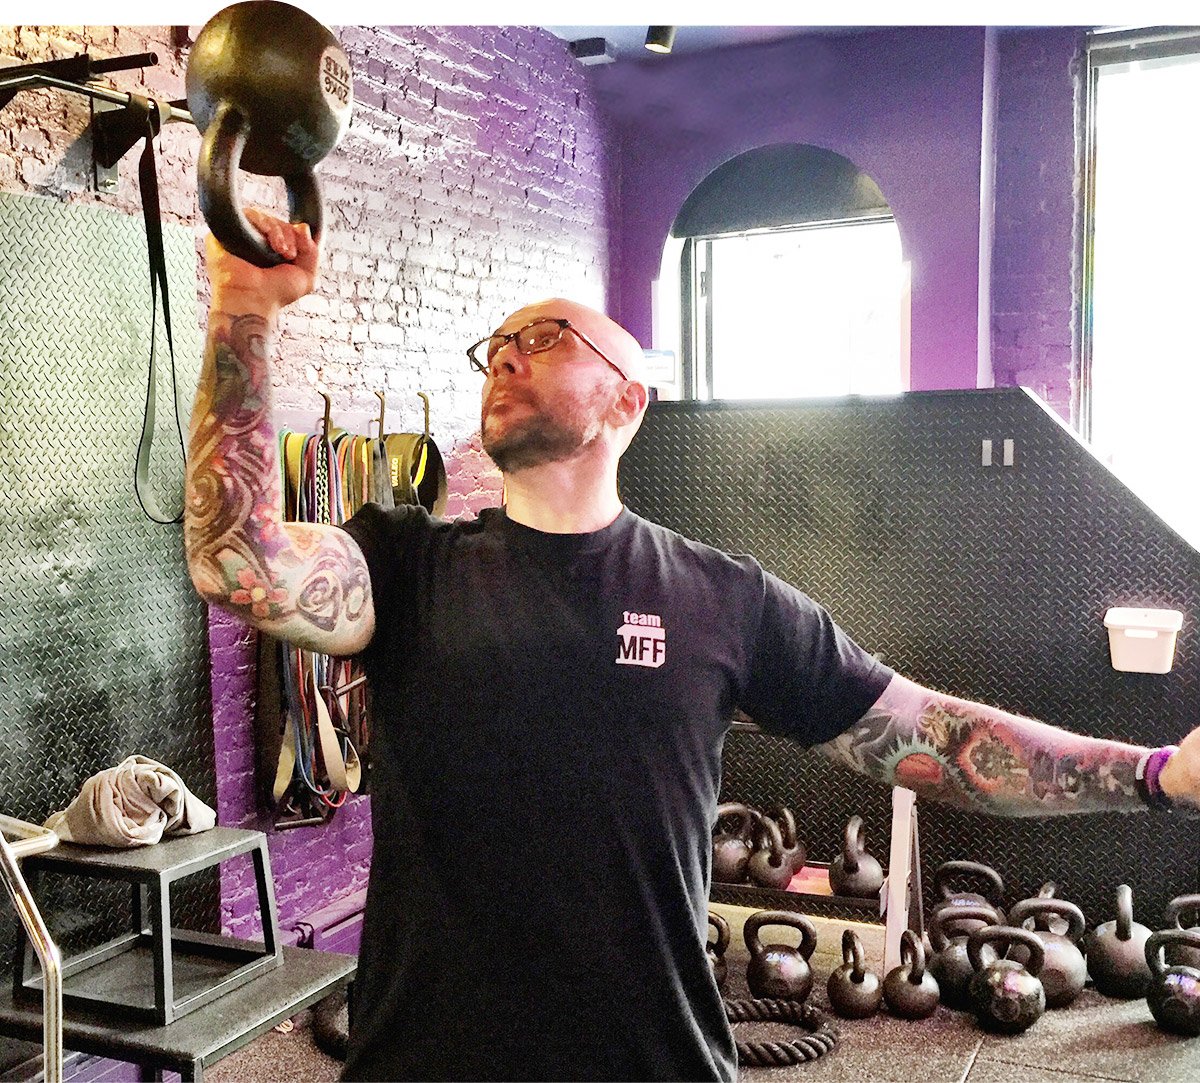
BOTTOMS-UP PRESS

TO STRENGTHEN THE CLEAN: DOUBLE CLEANS

Cleaning double bells will have a tremendous payoff for your single-bell press. Why? The simple reason is that your body will get used to cleaning weight heavier than what your single bell will be. It's easy to forget that the kettlebell clean isn't just a way to get the bell into position to press. It's also a powerful movement on its own, requiring a solid backswing and plenty of tension to get the bell into position. Double cleans will "clean" your single clean like almost nothing else. 
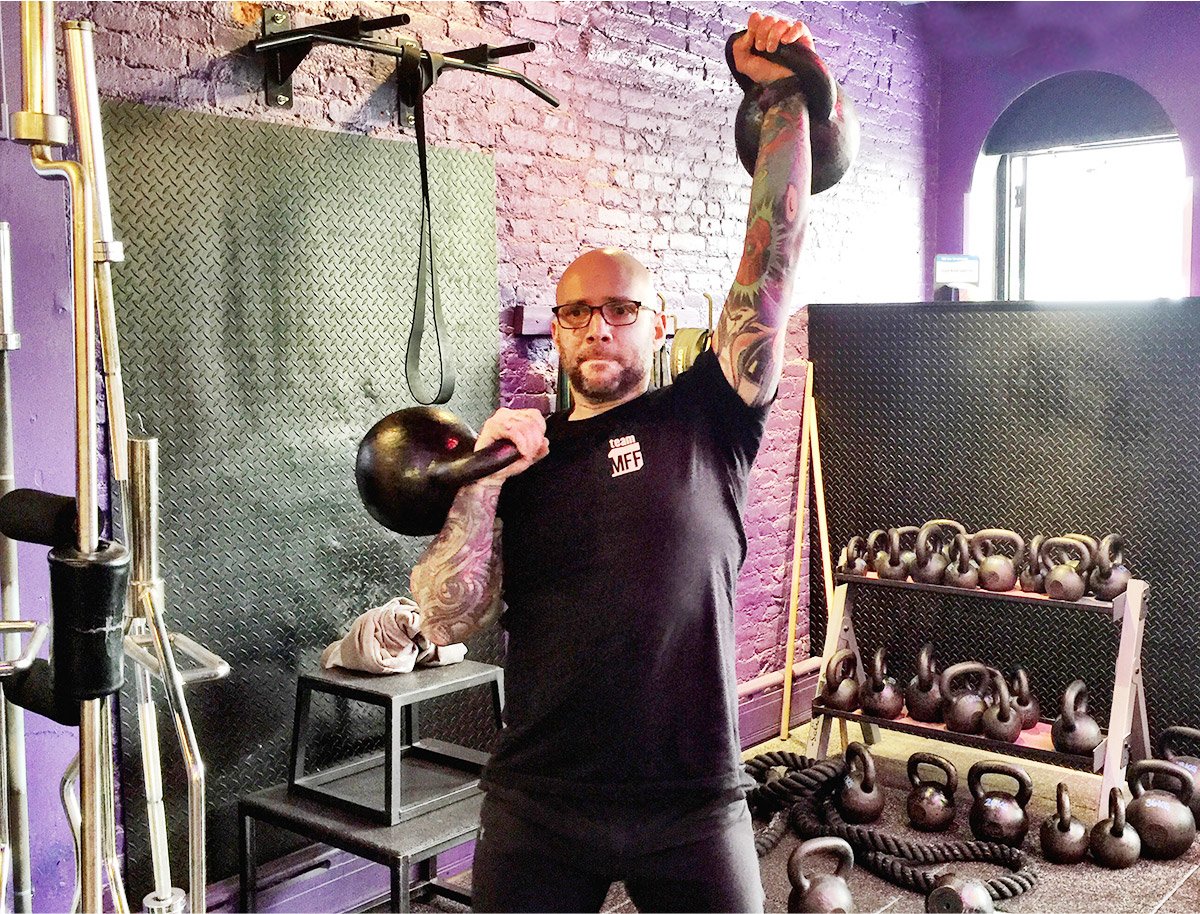
SEE-SAW PRESS

CORRECTING THE POST-CLEAN LEAN

When I witness someone fail a heavy single kettlebell press—and I've seen plenty of them—it usually goes south when they start to side-bend away from the bell right after the clean. Just as double cleans will help fix a sloppy clean, double presses can help your single press here. 
How? Pressing two bells at once removes the ability to side bend. Using double bells will also help you to generate the full-body tension that will power your press. 
Once you've become comfortable with double-bell presses, the seesaw press is an amazing way to build strength and competence in the pushing/pulling involved in pressing. Seesaw presses will force you to find and bring your lats into the fight.
For the double-bell clean and press, I would start with 3x5 of your 8-rep-max weight and build to 5x5 before switching to seesaw presses or a heavier pair of bells. I advise keeping seesaw presses in the range of 3-5 reps per side. 

WEAPON X THE BACKWARD LEOPARD CRAWL

The one exercise that had the most unexpected benefit to my press was backward leopard crawling. Not familiar with that movement? Here it is. 


After being on a crawl-intensive program from Tim Anderson, the founder of the Original Strength system, I couldn't believe how strong and stable my shoulders felt. 
Indulge me in an image for a second: When you crawl backwards, your shoulders basically become your hips and your arms become your legs. Everything has to work together, but in particular, each shoulder gets tied to the opposite hip in an X pattern. I found that building up time in a backward leopard crawl strengthened weak links in my shoulder girdle that I didn't know existed. Even just crawling on your hands and knees in a basic baby crawl can offer a restorative effect on your shoulders that can be a game changer when chasing a big press.
Take time building to 5 minutes of continuous backward leopard crawling, and see how sturdy your shoulders feel.

USE LADDERS TO CLIMB UP TO THE NEXT BELL SIZE

Strengthening the various parts of your press is one part of the game, but another is racking up some volume in your single-kettlebell press. This is where you start to put all of the other pieces together. Own the clean, crush the handle, press in the perfect groove, create tension throughout your body, and hold that kettlebell rock-solid at the lockout, then pull that baby back into the rack and repeat. 


For maximum efficacy, use your 5-rep-max kettlebell, and perform ladders of reps, like this: 
  • Rung 1: 1 rep
  • Rung 2: 2 reps
  • Rung 3: 3 reps
After the third rung, start over at 1 rep, and repeat the sequence five times total. Rest as much or as little as needed, but definitely put the bell down between each rung. That range will leave you with 30 reps per side. When the third rep feels easy at the end, add a 4-rep rung to the ladder. When the fourth rung gets easy, go up a bell.
Try some of these things or all of them, and they will help you press a heavier kettlebell and earn that badass new PR!