четверг, 31 декабря 2015 г.

Top 6 Kettlebell Exercises for Building Mass


I can hear the cries from gyms all over the world: 
KETTLEBELLS ARE JUST FOR CARDIO!”
“KETTLEBELLS ARE JUST FOR SWINGING!”
“KETTLEBELLS ARE JUST A FAD!”
Due to a few trainers in the world, kettlebells have been exclusively associated with cardio and should be no heavier than 15 pounds. Well, no wonder people think they can’t build muscle with them!
Kettlebells are fantastic for building strength and muscle just like the all-powerful barbell. When it comes to building muscle there are three incredibly important aspects that must be present:
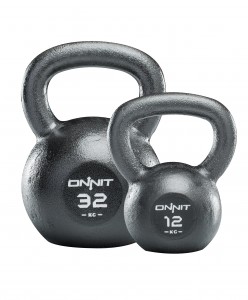
Onnit Kettlebells
Due to a few trainers in the world, kettlebells have been exclusively associated with cardio, but the reality is kettlebells are fantastic for building strength and muscle just like the all-powerful barbell.

A. Progressive Overload Regardless of the Stimulus

It doesn’t matter if it’s your bodyweight, a barbell, dumbbells, or kettlebells as long as there is a progression of lifting heavy weights often; your body will adapt by getting stronger. Beyond heavier weights, time under tension becomes a critical factor.
You’re not going to grow unless you increase the time in which your muscles are being stimulated (and I’m not talking about a massage). Muscular growth is triggered by this, but won’t happen unless the next two pieces of the puzzle are in place.

B. Proper Nutrition

Are you eating? Literally, right now, what’s in your hand? If you want to build muscle you need to be like Brad Pitt in nearly every scene of Ocean’s 11. Eat, eat, and eat some more. Quality is just as important as quantity. Sure you can build muscle with thousands of calories of burgers and fries, but quality should always come first.
The “right now” dictates that it’s not vitally important where the calories come from in terms of protein, fat, and carbs, but the long-term scope of your health should be your main driving force. Focus on quality and then quantity.

C. Plenty of Rest

Rest is free, relatively easy to get, and is infinitely helpful at building your body. Your body goes hard to work at repairing and adapting to everything you did during your session to make sure you come back stronger tomorrow to handle whatever life throws at you.
As long as these three things are present, let the muscle-building begin! Here are my top 6 Kettlebell Movements for building muscle:

#1. Kettlebell Double Clean & Press

#1. Kettlebell Double Clean & Press
This is a powerful movement (technically a few movements) that recruit a ton of muscle. When it comes to kettlebell exercises, few movements build muscle like the Double Clean & Press. With a combination of a hinge, pull, and press movement, you hit multiple, large muscle groups that will illicit growth (provided it’s the right amount of stimulus).
The Double Clean & Press can be manipulated in a number of ways during your training session to build your body such as, supersets combined with pull ups, ladders, timed sets, and more.

#2. Kettlebell Double Front Squat

They say that the squat is the king of movements, right? I’m not as infatuated as most, but I do understand the importance of the squat for not only building a strong, sexy pair of gams, but also for building your entire core and even your upper body.
Take the Double Kettlebell Front Squat for example; not only are you fighting the movement with your legs to get yourself back to standing after a nice deep squat, you’re also fighting the weights as they try to go in two separate directions. This puts your shoulders, arms, and upper back into the equation. Muy bueno for building muscle!

#3. Kettlebell Seesaw Floor Press

The problem with kettlebells is that most movements don’t hit the horizontal push pattern; enter the Floor Press! My favorite variation as it keeps the time under tension a bit greater is the Seesaw Press. Lie back flat and bring up both weights into a locked out position. Lower one (without slamming your elbow into the ground) and let the fun begin.
As you press that kettlebell, lower the other one. Reverse the motion in a controlled manner so the kettlebells always meet in the middle. This is tougher than it looks, but will do a number on your chest, shoulders, and triceps. Bonus tip: I like to elevate my hips to hit different parts of my chest and shoulders and incorporate the lower body into the exercise as well. Give it a try and thank me later.
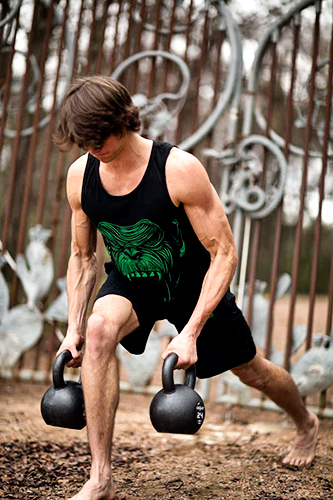
#4. Kettlebell Seesaw Row#4. Kettlebell Seesaw Row

Similar to the Seesaw Floor Press in that the kettlebells meet in the middle during a fluid motion, the Seesaw Row keeps the tension on the back (from lower to upper and everything in between), shoulders, biceps, and core.
Multiple muscle groups for the win! The added benefit of this movement is that you’re in a constant (slight) hinge to stay in a position which taxes the glutes and quads. Your grip also gets a nice beating as well.

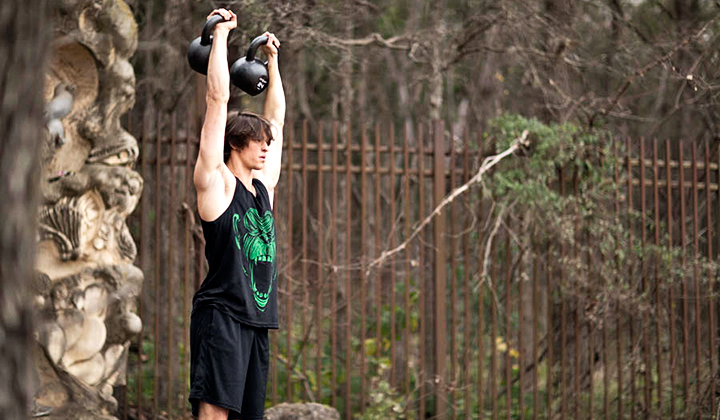
#5. Kettlebell Double Snatch

This is power and body awareness all rolled into one. Double snatches build big, strong shoulders and backs. Look at Olympic lifters and tell me that lifting heavy things overhead doesn’t build the upper body.
This really is a full body movement that will tax you to your core. Kettlebells make the movement a bit less technical than with the barbell, making it an easier solution for the average trainee to jump in on the fun.

#6. Kettlebell Bent Press

While all the other movements require a couple of equal kettlebells, the Bent Press is one of those movements that hits plenty with only one. By adding the twisting, squatting component to the movement, you recruit your entire body (less the arm without a kettlebell) and a ton of mobility.
You don’t need to go heavy with this one, but when you do (when you’re ready) you’ll see some amazing growth and the ability to lift heavier in other movements. When I went on a Bent Press rampage with moderate weight for low reps and high sets I saw my shoulders and triceps improve greatly while my overall mobility went through the roof. I wasn’t pushing hundreds of a pounds, but only 53-80 pounds (24-40kg) was plenty depending on the day.
There you have it. Six of my favorite muscle-building, strength-inducing, body-building kettlebell movements that will turn you from a kettlebell nerd swinging the 15 pounder to a strong, lean muscular athlete in no time.

Kettlebell Mass Building Workout

Top 6 Kettlebell Exercises for Building Mass
Here is a sample workout that will get you started with the six movements.
Perform all rounds of group A before moving onto Group B. Rest 60 seconds in between sets in all groups. No rest between arms in group B.
A1: Double Kettlebell Snatch – 6 rounds x 3 reps*
B1: Double Kettlebell Clean & Press and Front Squat Ladder – 3 rounds x 1-6 ladders**
C1: Bent Press Practice – 5 rounds x 3 reps (each arm)
D1: Kettlebell Seesaw Row – 3 rounds x 8-15 reps
D2: Kettlebell Seesaw Floor Press – 3 rounds x 8-15 reps
Notes

*Focus on the movement. Make it powerful and smooth.
**Perform 1 rep of each and then take a few second break. Perform 2 reps of each and then break. Repeat until 6 rounds are complete. Time how long that took you. Attempt to lessen the time with the same weight. Once you lessen it by 45-60 seconds, go to the next weight up. You may need to use different weights for the Clean & Press and Front Squat.

пятница, 25 декабря 2015 г.

Goblet Squats 101


Goblet-squats-101
The greatest impact I've had on strength and conditioning starts with a story:
Years ago, faced with 400 athletes who couldn't squat correctly, I attempted move after move, lift after lift, to teach the squat. I failed each and every time.
I saw glimmers of hope from teaching one kid the Zercher squat (weight held in the crooks of the elbows) and a few picked up the pattern when we lifted kettlebells from the ball off the ground (called "potato sack squats" because they look like you're picking up a sack of potatoes off the ground). But nothing was really working.
Somewhere between a Zercher and a potato squat was the answer. It came to me when I was resting between swings with the weight held in front of me like I was holding the Holy Grail. I squatted down from there, pushed my knees out with my elbows and, behold, the goblet squat!
Yes, the squat is that easy. It's a basic human movement; you just have to be reminded how to do it. Remember, squats don't hurt your knees, but how you perform them can.
Squats can do more for total mass and body strength than probably all other lifts combined. Doing them wrong can do more damage than probably all the other moves, too. The goblet squat fixes all.

Form: Squat Between Your Legs!

Let's start simply. Find a place where no one is watching and squat down.
At the bottom, the deepest you can go, push your knees out with your elbows. Relax. Go a bit deeper. Your feet should be flat on the floor.
For most people, this small movement – driving your knees out with your elbows – will simplify squatting forever.
Next, try this little drill: Stand arms-length from a doorknob (or partner). Grab the handle with both hands and get your chest up. Up!
doorknob-drill
Imagine being on a California beach when a swimsuit model walks by. When an athlete does this, he immediately puffs up the chest, which tightens the lower back and locks the whole upper body. The lats naturally spread a bit and the shoulders come back a little. Now, lower yourself down.
What people discover at this moment is a basic physiological fact: The legs are not stuck like stilts under the torso. Rather, the torso is slung between the legs.
As you go down, leaning back with arms straight, you'll discover one of the true keys of lifting: you squat between your legs. You don't fold and unfold like an accordion; you sink between your legs. Don't just sit and read this. Get up and do it!
Now you're ready to learn the single best lifting movement of all time: the goblet squat.

Get Started

Grab a dumbbell or kettlebell and hold it against your chest. With a kettlebell, hold the horns, but with a dumbbell just hold it vertical by the one end, like you're holding a goblet against your chest. Hence the name, "goblet squats."
Now with the weight cradled against your chest, squat down with the goal of having your elbows – which are pointed downward because you're cradling the bell – slide past the inside of your knees. It's okay to have the elbows push the knees out as you descend.
6' 9" OLYMPIC BASKETBALL PLAYER DUNCAN REID AND 5' 2" ALYSSA UMSAWASDI.
The point? Each can goblet squat just fine.

Stop Thinking. Start Squatting.

Here's the million-dollar key to learning movements in the gym: Let the body teach the body what to do. Try to keep your brain out of it! Over-thinking a movement often leads to problems. Allow the elbows to glide down by touching the inner knees and good things will happen.
The more an athlete thinks, the more the athlete can find ways to screw things up. Don't believe me? Join a basketball team and get into a crucial situation. Shoot a one-and-one with three seconds to go, down by two points, and get back to me later if you decided thinking was a good idea.
Goblet squats are all the squatting most people need. If the bar hurts in back squats (I won't comment), your wrists hurt in front squat (swallowing my tongue here) and the aerobics instructor has banned you from using the step boxes for your one-legged variations, try the goblet squat.
Seriously, once you grab a bell over 100 pounds and do a few sets of 10 in the goblet squat, you might wonder how the toilet got so low the next morning.

Foot Placement and Patterning

Where do you place your feet? Do three consecutive vertical jumps, then look down. This is roughly where you want to place your feet every time you squat. The toes should be out a little. You don't want to go east and west, but you want some toe-out.
This drill, along with the goblet squat, teaches patterning. Unless you already have the pattern, you shouldn't move into heavier work.

From Goblets to Grinds

Like goblet squats, I also have my athletes do grinding moves called double kettlebell front squats (DKFS). The load remains in front, forcing the whole core to stay rigid. Moreover, with two bells, you can still have your elbows down to push the knees out.
DKFS are exhausting in an odd way: like wrestling an anaconda, you seem to be slowly choking yourself to death. The pressure is also teaching you to stay tight, but continue to grease up and down.
Also, the DKFS seems to really work the upper back in the style I call "compression." It's a forgotten method of muscle and strength building where the constant squeezing of a muscle system is the movement, for lack of a better term.
The goblet squat and the DKFS lend themselves to the two greatest workouts I know: the ButtBurner 4000 and the Eagle.

The Workouts

In my last two articles, I introduced these two exercises: the Bulgarian Goat Bag Swing and the Farmers Walk. Let's look at all the fun you can have with these two!
Grab a kettlebell or dumbbell in the 25-60 pound range. Go lighter than you think. Now, do this:

The ButtBurner 4000

  • Perform one goblet squat, then one Bulgarian Goat Bag Swing.
  • Perform two goblet squats, then two Bulgarian Goat Bag Swings.
  • Now, three and three. Work your way up to ten and ten... if you can.
If you just go to fives, that's 15 reps of each exercise. Tens gets you 55 each, and a lot of lost breath. It should go without saying but I'll say it anyway: build up on this one slowly.
This combo will revitalize the entire lower body and teach you to really own both patterns (hinge and squat).

The Eagle

The "Eagle" is named after the school's mascot I used to teach at in Utah. It combines the farmer's walk (the basic patterning or teaching tool for loaded carries) with the grinding double kettlebell front squat.
It's simple:
  • Grab two kettlebells (I'm not sure anything else works, but you can experiment) and do five to eight front squats.
  • Drop the bells to your sides and walk away, perhaps as far as 40 meters.
  • Do another set of front squats.
  • Walk again.
If you can do eight sets of eight with this exercise (plus serious farmer walks in between) you are in rare air.

Greatness with Patience

The mistake most trainees make is that they try to move too quickly for complex movements before getting the form down. But greatness resides in those who have the patience to master the patterns first, t hen add complexity later.
The simple patterns can also make for the most shockingly exhausting workouts. Try the ButtBurner 4000 and the Eagle sometime and see the value of simple, hard work.

четверг, 24 декабря 2015 г.

ПОВОРОТ С ГИРЕЙ ЛЁЖА: ЗДОРОВЬЕ И СИЛА

Тренировок с гирями в последнее время было опубликовано немало, предлагаю вернуться к деталям. А именно – к упражнениям с гирями и технике их выполнения. Покажу одно упражнение, по-английски называется arm-bar stretch. По-русски давайте назовём его «поворот с гирей лёжа». Если есть другие предложения по подходящему названию – пишите в комментариях, возможно, это будет-то что-то более точное.
Поворот с гирей лёжа – упражнение для стабильности плеч, для лучшей мобильности в грудном отделе. Помогает достичь большей силы и мобильности в рывках, приседаниях с гирей над головой, жимах, толчковых жимах, толчках, отжиманиях на брусьях.
Поворот с гирей лёжа рекомендуется как для профилактики травм плеча, так и для реабилитационного периода после травм. Упражнение начните выполнять с относительно лёгкого для вас веса. Поставить его можно или в разминку-начало тренировки или в конец. Рекомендуемое количество повторений: 3-5.

1. Лягте на спину, гиря расположена сбоку от вас. Повернитесь на бок, чтобы взяться за гирю двумя руками. Перекатитесь обратно на спину.
2. Из положения лёжа на спине выжмите гирю. Рабочая рука расположена строго вертикально и полностью выпрямлена. Дужка гири лежит в ладони под углом в 45 градусов. Свободную руку подвиньте выше, чтобы бицепс располагался на линии с ухом. Правую ногу согните, пяткой прочно упритесь в пол.
3. Отталкиваясь ногой, плавно перекатитесь на другую сторону, одну ногу перенесите через другую. Рука с гирей в это время остаётся вертикальной. Взгляд направлен на гирю.
4. Бедра направляются к полу. В нижней точке задержитесь на 3-5 секунд и вернитесь в исходное положение.
Знакомо вам такое упражнение или первый раз встречаете?

ГИРИ ИЛИ КАК ВЫСОКО ПРЫГАТЬ


Учёные из института Падуи (Италия) опубликовали этой осенью исследование, в котором танцоры балета тренировались с гирями в течение 3 месяцев. Результаты порадуют любителей гирь.
Большинство читателей этот статьи точно не ставят себе цели стать лучше в области балета. Но данные исследования могут рассказать о том как улучшить свою спортивную подготовку, и в частности, дают ответ на вопрос «Как высоко прыгать?»  У танцоров балета улучшился баланс и прыжки после завершения простой программы тренировок с гирями.


Методы

Исследователи поделили танцовщиков на две группы. Одна группа занималась по обычной балетной программе по отработке прыжка. Вторая вместо своих традиционных занятий выполняла под руководством инструкторов протокол, основанный на книге Павла Цацулина Simple&Sinister.
Занятия длились 3 месяца (по 4 раза в неделю)
1. 20 свингов одной рукой (по 10 на каждую руку) в минуту на протяжении 5 минут. (Всего получится 100 свингов)
2. Отдых 1 минута
3. Турецкий подъём – смена рук каждую минуту, выполнять в течении 10 минут.

Что измеряли

• Баланс – исследователи использовали специальную платформу для измерения баланса. Это приспособление измеряет насколько далеко человек отклоняется назад-вперёд и насколько быстро. Танцоров измеряли пока они стояли на одной ноге с закрытыми глазами.
• Прыжки – использовалась оптическая система, чтобы протестировать насколько высоко танцоры прыгают и сколько при этом контактируют с поверхностью. Оптический анализ может измерить изменения, достигающие тысячные доли секунды.
• Сердечный ритм – также измерялась частота пульса и давление.
Результаты

Как видно по двум графикам ниже, исследователи обнаружили улучшения в балансе и прыжках в группе, тренировавшейся с гирями, а в контрольной группе никаких изменений не зафиксировано. Также в гиревой группе улучшился пульс в покое.


Практическое применение

Очень интересным результатом является то, что улучшился баланс. Танцоры балета и так весьма хороши по этому показателю. И улучшение баланса у таких подготовленных людей действительно впечатляет.
Вертикальный прыжок также улучшился. В этом исследовании он был специфического вида – без замаха руками.
Уже много написано о свингах с гирей, но они продолжают поражать своим позитивным эффектом. Это простое упражнение для освоения и оно учит прыгать выше. Такой эффект происходит благодаря тому, что в процессе движения вам надо изменить направление движения тяжёлой гири в нижней точке упражнения. Мышцы быстро переходят от растяжения к сокращению, что оказывается весьма полезно для танцоров балета.


А для всех нас это ведёт к многим положительным адаптациям, включая улучшение абсолютной силы (например, в становой тяге), улучшению вертикального прыжка (например, актуально для игроков в волейбол) и баланса.

Ссылки
1. Borgatti, E., Marcolin, G., Zonin, F., Grigoletto, D. & Paoli, A., "Effects of kettlebell training on lower limb power, body balance, blood pressure and heart rate in a group of dancers," Italian Society of Motor and Sports Sciences (SISMeS), October 2-4, 2015.
2. Tsatsouline, Pavel. Kettlebell Simple & Sinister. StrongFirst, Inc., 2013.

Источник: http://breakingmuscle.com

среда, 23 декабря 2015 г.

How to Kettlebell Swing: The Center of the Kettlebell Universe

http://leotraining.io/how-to-kettlebell-swing-the-center-of-the-kettlebell-universe/


The Kettlebell Swing!

In lieu of this week’s holiday and shortened work week I will be keeping this week’s blog on the kettlebell swing to just the video. We’ll be back next week with our next episode.
The kettlebell swing is a fantastic exercise so take your time and practice your hip hingedeadlift and the 3 drills from today’s video to pattern and learn the kettlebell swing. Take your time and focus on quality swings. You will reap the dividends later on.
In Summary focus on these 5 points.
  1. Be sure to use the biomechanical breathing match. This technique forms a bubble of intrabdominal pressure that protects your spine and low back!
  2. Tilt the bell toward you, take a sniff of air through your nose, and hike pass the kettlebell between your legs.
  3. Stand up ramrod straight. Think: “Push through the floor” You want a plum line from your ear to your ankle at the top of the kettlebell swing.
  4. At the top of the swing, you should be under total tension from the shoulders down. Snap your hips, squeeze your glutes, brace your abs for a punch.
  5. Play chicken! Wait until the last possible moment to hinge your hips back for the next repetition.
Note: Here is a link where you can purchase kettlebells.

References

1) Jones, Brett. Cook, Gray. Kettlebells from the Center: Dynami. Functional Movement Systems. 2010. Print.

Kettlebell Swing Corrections

 http://leotraining.io/kettlebell-swing-corrections/

Kettlebell Swing Corrections

Regress to Progress

The kettlebell swing is simple but not easy. It requires timing, strength, stability, and persistence. Groove the pattern. There are a lot of poor examples of swings out there. Take a look at this Jillian Michaels video. There is no hinge, the kettlebell handle is passing below the knees on the hike phase, and their not maintaining a neutral spine.
Here are three drills you can practice to correct your kettlebell swing and pattern perfect form. All three of these drills will be centered around the hardstyle plank. We will start from the ground up and progress through different postures.
Note: If you are interested in purchasing kettlebells, order here!

The Hardstyle Plank

Joe DeLeo performs the hardstyle plank.
The hardstyle plank.
Use this drill to learn total body tension
At the top of the kettlebell swing your body forms a plum line from your ankle through your ear.  Your body is filled with tension from the shoulders down as the kettlebell comes perpendicular to your chest (the arms remain relaxed). This posture is the same as if you were in a plank position!
You must learn to get tight. The glutes, abs, lats, and quads are all contracted and tensed at the top of the swing. To simplify this concept we remove the kettlebell and go back to the ground level.

Kneeling Plank

Tall-Kneeling Plank with Kettlebell behind you.
Tall-Kneeling Plank with kettlebell behind.
Tall-Kneeling Plank with Kettlebell in front.
Tall-Kneeling Plank with kettlebell in front.


Use this drill if you finish your swing and your butt is sticking out behind you.
In this drill make sure you take the time to get the set up correct. This kettlebell swing correction will force you to create the proper alignment and posture necessary while firing all of the necessary muscles that will be used in the swing.

Back to the Wall Plank

Use this drill if you lean back at the top of the swing.
Deadlift a kettlebell. Step back to a wall and make sure head, shoulders, glutes, and heels are in contact with the wall.
  • Push into the floor with your feet. Root down into the ground.
  • Squeeze your glutes. Crush a walnut with your butt cheeks.
  • Tense your abs. Brace for a punch
  • Fire your lats. Squeeze an orange under your armpit. Make orange juice!
  • Incorporate power breathing

Summary

These 3 drills are great kettlebell swing corrections. Identify what area of your swing you need to work on and then incorporate the appropriate drill. Whether it is learning to create total body tension at the top of the swing or proper posture and alignment through your pelvis or shoulders you’re covered with all three of these regressions.
References
  1. Jones, Brett. Cook, Gray. Kettlebells from the Center: Dynami. Functional Movement Systems. 2010. Print.
  2. Cook, Gray. John, Dan. Burton, Lee. Essentials of Coaching and Training Functional Continuums. 2014. DVD.

How to Do The Kettlebell Arm Bar

http://leotraining.io/how-to-do-the-kettlebell-arm-bar/

 By Leo Training s

How to Do the Kettlebell Arm Bar

The kettlebell arm bar is a great drill for thoracic mobility, shoulder stability, and motor control development through all different types of movement patterns. In my opinion this is a logical regression to learning the Turkish Get Up (which I will cover in an upcoming blog) and one that an individual must demonstrate full ownership of before trying to roll and stand up!

Start from the Ground Up

In the DVD, Secrets of the ShoulderBrett Jones and Gray Cook discuss four secrets or keys to unlocking shoulder mobility and motor control (1). They are:
  • Diaphragmatic Breathing
  • Posture
  • Grip
  • Joint Position (Alignment)
Each of these elements should be present in the Turkish Get Up and the kettlebell arm bar. To own The Turkish Get Up you should begin with the kettlebell arm bar. Spend some quality time on the ground getting comfortable with holding the kettlebell and maintaining alignment in different positions (that’s the posture part!) and make sure your breathing is under control. A change in breathing (faster and shorter breaths) is a sign that the body is craving stability and safety. This will make it much easier to transition to the more complex movements later on. The brain does not learn or retain information in stressful situations. Slow down, learn the movements and nuances and reap the rewards later!

The Set-Up

“Your set up is your first repetition.”  from Team Leader Pavel Macek who gave credit to Master SFG Fabio.
I heard this at my SFG Level I certification in August and it is such a pearl of wisdom. Don’t rush the set up. Make it perfect. Take your time because this lays the foundation for the first repetition and the rest of the set. Check out the pictures below for a great visual on the important technical points that I couldn’t stress in the video.
Proper Position for the Kettlebell Arm Bar
Proper set-up position for the Kettlebell Arm Bar

The Roll To Press

The Roll to Press - The first step in the kettlebell arm bar and Turkish Get Up
The Roll to Press – The first step in the kettlebell arm bar and Turkish Get Up

“Rolling Over”

Once the kettlebell has been pressed to lockout you are ready to take the next step. Extend your free arm overhead and your opposite leg. Position the foot of the kettlebell side leg at a 45 degree angle and near your glute. You need to find the position that is comfortable for you and allows you to perform the movement proficiently. Proceed with caution if placing the heel very close to the glute – this can cause additional stress on the knee so it’s prudent to leave some space between the heel and glute.
Push through your heel and drive into the floor. You’ll contract the glute , engage the hip and your core. Roll to your side while maintaining alignment and control of the kettlebell.
The first phase of the arm bar. Movement is initiated by pushing through the heel.
Look at the difference between these two photos. The only change is that the glute is contracted my driving through the heel and that hip is off the ground. This is how we connect the arm/shoulder to our core!
The initial roll of the arm bar.

The Arm Bar

The final position of the arm bar.

Return to your back by rolling back under control. To increase your control squeeze your glute of your post leg (the leg that’s bent). Pull the weight back down with both hands and roll like a baby to your side in the fetal position – identical to the position in the set-up photo.

Summary

  • Maintain a neutral wrist and packed shoulder throughout the entire arm bar.
  • The movement is initiated by pushing the heel down into the floor.
  • “Energy flows in 2 directions in the arm bar: extending the kettlebell and packing the shoulder. ” (1)  – Brett Jones, Secrets of the Shoulder
  • The drill is not over until the kettlebell is parked safely back on the ground.
There you go! A video and step by step breakdown of the kettlebell arm bar with a lot of the technical nuances in there to help improve the drill. Give it a try and let me know what you think.

References

  1. Cook, Gray. Jones, Brett. Secrets of the Shoulder. Functional Movement Systems. DVD. 2006.
  2. Cheng, Dr. Mark. Cook, Gray. Jones, Brett. Kettlebells from the Ground Up. Functional Movement Systems. Manual and DVD. 2008.
  3. Tsatsouline, Pavel. Simple & Sinister.  StrongFirst, Inc. Print. 2013.